4 General Physical Examination of the Horse
The general physical examination of any species cannot be undertaken as an isolated event; it must be first preceded by a detailed exploration of the patient history, as well as consideration of the animal’s signalment and presenting complaint. These have been covered in detail elsewhere in the lectures in this course, but are the required “first step” to take before proceeding with the following hands-on examination of the animal.
The Distance Examination: General inspection of the horse and its environment
Prior to handling the horse, inspection of the animal’s environment is done. This includes general assessment of the horse’s surroundings, which can be very informative in terms of animal health and risk factors for disease. Aspects of the environment to evaluate include such things as:
- type of facility
- number of animals in the facility and age groups represented
- barn design and individual housing design
- turnout facilities
- hygiene
- temperature of facility (barn should not be warm)
- air quality (walls should not “sweat” from humidity, no ammonia build-up)
- type of bedding used
- feed type and quality, presence of feed
- water source
- evidence of urination (quantity, character)
- evidence of defecation (quantity, character)
- evidence of any abnormal discharges (i.e. on feed or water buckets, etc.)
Once the environment has been assessed, the examiner can turn their attention to the animal, still observing from a distance.
Mentation is noted. In horses, the healthy and alert horse typically has their head mildly elevated and their ears are up and pointing forward. They will generally pay attention to people approaching them.
An important parameter to assess from outside the horse’s stall *before handling the horse* is the respiratory rate and character. The respiratory rate can be measured by observing movement in the flank region, or flaring of the nostrils if this is present. The number of respirations over a minimum of 15 seconds is counted, and this number is then multiplied to calculate a respiratory rate per minute. If the horse is eating or moving around the stall, it may not be possible to get a representative respiratory rate, in which case this part of the examination can be repeated later in your assessment of the animal, once they have become accustomed to you working with them.
In addition to the respiratory rate, the observer should check for any increased respiratory effort to breathing, which may appear as increased abdominal movement for each breath or as nostril flaring. The horse may also stand with its head extended if they are in respiratory distress.
If possible, the body symmetry and posture are noted while the horse is in the stall, ensuring that the horse is bearing weight equally and comfortably on all four limbs. This may need to be done outside the stall later in the examination if poor visualization restricts the ability to assess this in the stall.
The General Physical Examination


Once the distance examination has been done, the examiner can approach the horse to perform the general physical examination. The order in which the examination is done should be systematic and consistent so that structures are not missed. Typically, the examiner approaches the horse from the near (left) side, as this is the side that horses are most used to being handled from. A lead rope should be placed on the horse for restraint whenever working with the horse in any way. If feasible (ie. only if space permits to accomplish this safely), it is most useful to first walk around the horse from a distance to see the “big picture” of the whole horse, and then do a hands-on examination starting with the head, proceeding down the left side of the body and finishing with the right side.
Body condition score is assigned by viewing the horse from all angles, being sure to specify the scoring system used (and the denominator!) since different scoring systems exist (eg. using scales out of 5 or 9). The Body Condition Score should reflect assessment of the neck (crest, neck transition into the shoulder), withers, ribs, topline (dorsal crease), hips, and tailhead. Although much of the Body Condition Score is determined by visualization, it is often necessary to palpate certain structures (eg. ribs, point of hip) to refine the score assigned to the horse.
Examination of the Head
Whenever working around the head of the horse, it is advisable to maintain one hand on the halter at all times (even though you have a handler assisting you). This is to protect yourself from injury (e.g. concussion, broken nose) in the event that the horse moves their head suddenly – by having a hand on the halter, you can both control the head as well as detect any such movement and take measures to protect yourself.
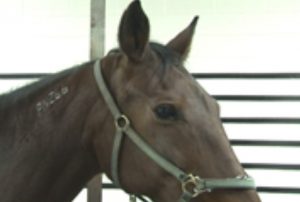
Symmetry of the head should be visualized from in front of the horse.
In particular, compare left versus right sides for symmetry of the following:
- temporal muscles (move the forelock out of the way to assess this!)
- masseter muscles
- ear carriage
- eyes and eyelid position
- angle of the eyelashes
- deviation of the muzzle to one side
Note the presence and character of any discharge from the eyes, nostrils, or mouth. If discharge is present, note the character (serous, mucoid, mucopurulent, sanguinous, blood) and whether it is unilateral or bilateral.
[REPLACE IMAGE]
Palpate the molars through the cheeks to determine if sharp “points” or edges are present along the molars of the upper dental arcade. The presence of sharp “points” or resulting mucosal ulceration will result in the horse showing discomfort as you palpate through the cheek. As well, gaps may be detected, representing missing teeth requiring further investigation. Do not slide your hand into the halter to accomplish this palpation of the molars – if the horse suddenly lifts its head in response to you causing discomfort, this could result in injury to your hand! Instead, move the halter out of your way to palpate the underlying molars.
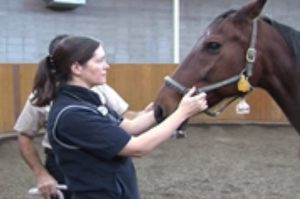
Palpate the facial artery. This is easiest to locate by standing just off to the side in front of the horse and holding your first two fingers along the angle formed where the mandible meets the masseter muscle. In this area, the facial artery is detectable (like a piece of spaghetti!) and should be gently nestled between the 2 fingers – the pulse can then be assessed for pulse strength and rhythm (to ensure there are no gaps between pulsations), and the rate can even be counted over 15 seconds to obtain a heart rate per minute if necessary.
[IMAGE OF PALPATING FACIAL ARTERY]
Also palpate the submandibular region to determine the size and character of the submandibular lymph nodes, which sit as a chain of several lymph nodes on each side, just medial to the mandible. To improve your likelihood of identifying the lymph nodes, place your thumb ahead of the halter band, your fingers behind the band, and grope upwards to try and trap the lymph nodes in your hand. Palpating in this manner vastly improves your chances of finding them! Palpate to the left side, centrally, and to the right side between the mandibles to perform a thorough check. Submandibular lymph nodes may not necessarily be palpable in adult horses, although small, non-painful lymph nodes may sometimes be identified as a normal finding in adult horses. In contrast, it is more common to find enlarged submandibular lymph nodes in young (yearling) horses when they first enter new environments such as training facilities (and thus are encountering a myriad of new infectious agents). The submandibular lymph nodes should not, however, be larger than small walnuts even in these horses, and should not be painful on palpation or draining any mucopurulent discharge.
Detailed Examination of the Eyes
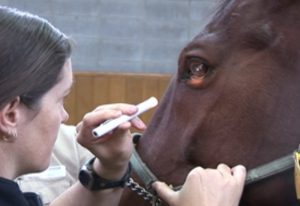
It is best to perform the pupillary light reflexes (direct and indirect) first, while the horse is still inquisitive and is holding their eyes open (i.e. the order of the eye exam should be “penlight before pokey bits!”). Standing beside the horse, hold the penlight several inches away from the eye and shine it directly into the pupil. The pupil should constrict partially in response to the light. This is the direct pupillary light reflex, testing the optic (CN2, sensory) and oculomotor (CN3, motor) nerves. The indirect or consensual pupillary light reflex can be assessed in horses, but generally requires two people. One person shines their penlight into the eye as above, and the other person observes the opposite eye for pupillary constriction. It may be difficult to see the pupil of the opposite eye in a dimly lit barn, thus a second light can be shone from a distance (arm’s length) in order to illuminate the opposite eye without causing pupil constriction.

When examining the eye, you will see the corpora nigra that are frequently located along the edge of the horse’s iris. They appear as round, brown or black globular structures lining the dorsal margin of the iris at the opening of the pupil. These are normal findings in horses, although they can occasionally expand over time to the point that their size obstructs vision by blocking light passage through the pupil.
[INSERT SKETCH]
Also using the penlight, check for the three Purkinje-Sanson images (“the three reflections”), representing light reflecting off of:
- the cornea (= the brightest reflection of light, right on the surface of the eye!),
- the anterior surface of the lens (= a slightly smaller but still bright reflection), and
- the posterior surface of the lens (= a much, much smaller reflection that appears quite distant).
The Purkinje-Sanson images indicate that light is penetrating the eye to the level of each of the above structures. Failure to see one or more of the three images indicates that there is an abnormality within the eye that is blocking the passage of light through the cornea, anterior chamber and lens of the eye. Noting which images are seen can help to localize the lesion (ie. where is the pathway of light being interrupted?).