Arthrocentesis
Arthrocentesis (“joint taps”) are used to obtain a sample of joint fluid.
Summary of the Procedure:
| Indications | Obtain a sample of synovial fluid for cytology and microbial culture in the work-up of the animal with lameness potentially due to joint disease, fever of unknown origin, or weight loss of unknown origin.
Most often used in the work-up of immune-mediated polyarthritis and septic arthritis (joint or joints are usually swollen, warm, or painful). More common in dogs than cats. |
| Limitations | Very rarely, synovial membrane may have pathology that is not reflected in synovial fluid (e.g. pannus formation in rheumatoid arthritis).
Limited utility in the work-up of degenerative joint disease. |
| Complications | Uncommon, but include hemarthrosis, cartilage damage, infection, needle breakage. |
| Contraindications | Bleeding disorder (relative contraindication), periarticular cellulitis. |
| Supplies/instruments | 3 mL syringes,
22ga 1-1.5 in needles (stifle), 22 to 25ga needles (most other joints are best with 25) Glass slides. |
| Position | Usually lateral recumbency |
| Restraint | Usually heavy sedation, general anaesthesia |
Landmarks:
- Gently flex and extend the joint in order to palpate joint spaces. Joints can be difficult to aspirate in normal dogs & cats. Specific joint landmarks are detailed below.
Tips:
- Use the smallest gauge needle possible to maximize your chance of entering the joint space without creating trauma (most joints except stifle can be accessed with 25ga ½ inch length needles)
- Attach the needle to the syringe prior to doing the arthrocentesis (unlike horses)
- Aspirate only a small quantity of joint fluid – the more you aspirate, the more chance of creating iatrogenic hemorrhage. Only one or a few drops per joint are needed for cytology (& culture if indicated). It can be difficult to retrieve fluid from cadavers.
Details of the Procedure:
- Clip and surgically prepare a 4-6 cm2 area over the joint.
- Hold the syringe as for giving an injection, or use a fist-grip with the needle directed downwards, and insert the needle through the skin into the joint space. Whichever grip is used, it is important not to change grip during the procedure. If bone is encountered, withdraw slightly, and re-direct. If the procedure is unsuccessful after two attempts at redirecting, withdraw the needle altogether and begin again.
- Gently aspirate. Unless the joint is grossly distended, only a small amount of fluid will be retrievable. Excessive aspiration will result in blood contamination. Stop aspirating (i.e. release negative pressure) prior to withdrawing the needle.
- Place a small amount of fluid on a slide, place a spreader slide on top perpendicularly, and quickly smear. Note viscosity.
Example of Normal Joint Fluid:
Note the fluid is clear and viscous (“string” of fluid is apparent after a drop of fluid is expressed from the needle onto the slide).
Carpus:
- Radiocarpal joint – Palpate the joint spaces on the dorsal surface of the carpus (they are often a size that permits you to have your fingernail drop into the divot or joint space as you are palpating). Choose a joint space, and direct the needle perpendicular to dorsal surface of joint. The joint space is very superficial. Avoid the blood vessel coursing over the joint.
- Intercarpal joint – As for radiocarpal joint. The two joints do not communicate.


Example of Carpal Arthrocentesis
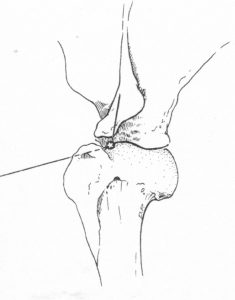
Elbow:
- Flex the joint slightly, palpate the caudal aspect of the joint to identify the olecranon and humeral condyle. The joint space you are targeting is between the humeral condyle (lateral to the joint space) and the olecranon (medial to the joint space).
- Insert the needle into the skin just caudal to the lateral aspect of the epicondyle of the humerus, and just above the dorsal edge of the olecranon. You are sliding your needle in the small space between the humeral epicondyle (lateral to your needle) and olecranon (medial to your needle). Keep the needle parallel to the dorsal edge of the olecranon. Common mistakes: the tendency is to be too low (i.e. over the olecranon, inserting too close to the bone) and to direct too ventrally.

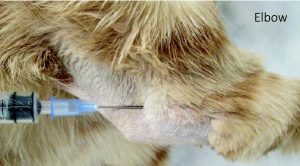
Example of Elbow Arthrocentesis
- Note on positioning – dog’s head is at the bottom of the video; tail would be at the top of the video screen; clinician is approaching from the caudal aspect of the joint:
Shoulder:
- Lateral approach – Put the patient in lateral recumbency, and hold the limb parallel to the table (similar position as though the animal was standing). With the joint in partial flexion, insert the needle just cranial to the glenohumeral ligament, and slightly distal to the acromion process of the scapula. Direct the needle medially.
- Cranial approach – With the joint in partial flexion, insert the needle medial and proximal to the lateral aspect of the greater tubercle of the humerus, ventral and lateral to the supraglenoid tubercle of the scapula, and advance slightly dorsally along intertubercular groove ventral to the acromion of the scapula. The main problem is not being sufficiently medial to the greater tubercle.
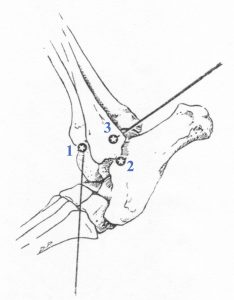
Tarsus:
- Craniolateral or anterior approach (1 in line diagram) – Flex and extend the joint to palpate the joint space between the distal tibia and tibiotarsal bone on the craniolateral surface of the joint. Mildly extend joint and insert the needle into the joint just distal to the end of the tibia. Direct the needle caudally at an approximately 45o angle into the tibiotarsal joint.
- Lateral approach (2) — Flex and extend the joint to palpate the joint just distal to the lateral malleolus of the fibula. Caution – the lateral saphenous vein is in this region; you may need to displace it gently with your finger to access the joint space. With the joint in neutral to mildly flexed position, insert a 25ga needle just caudal to the malleolus, directing the needle tip medially and slightly cranially.
- Caudolateral approach (3) — Flex and extend the joint to palpate the joint between the distal tibia and trochlea of the talus. The joint space is bordered by the fibula (laterally) and the distal tibia (medially), with the talus at the caudal aspect of the space. Flex joint moderately and insert the needle caudal and medial to the lateral malleolus of the fibula.
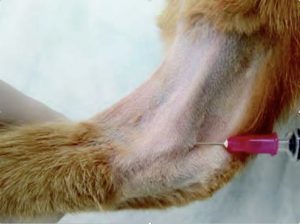
Stifle:
- Flex the joint. Insert the needle slightly lateral to the patellar tendon, halfway between the distal patella and tibial tuberosity. Direct the needle caudally, and slightly medially (towards the opposite condyle). In some animals, you may need to push your thumb into the medial aspect of the joint space, to help the joint space distend out to the lateral side (giving yourself a bigger target). The joint space is deeper than the others that you are performing arthrocentesis on, and you need to go caudal to the fat pad in this joint. [You can perform this approach in reverse from the medial aspect of the joint (directing caudally towards the lateral condyle)].

Example of Stifle Arthrocentesis:
- Note on positioning: the dog is in lateral, with the dorsum is at the bottom of the screen, limbs are pointed to the top of the screen.